All the Features You Want, One Click Away
Powerful tools for mobility planning, analysis, and simulation — all in an intuitive desktop application that empowers you to turn data into smarter decisions.
Intuitive map and data handling.

Select single elements or select multiple scenario elements by drawing a box. Hold ‘Shift’ to add elements to your selection.

Select multiple scenario elements by drawing a polygon. Hold ‘Shift’ to add elements to your selection.

Move the map.

Zoom in.

Zoom out.

Zoom to layer extent.

Delete selected item(s).

Undo the last operation(s), step by step. Also complex operations in the table view can easily be undone.

Redo the last operation(s), step by step.

Edit the selected item(s) in an attribute editor. This is for quick attribute editing. For advanced features, please switch to the table view.

Open the selected scenario elements in an advanced table view. Use the table view to edit, delete or add scenario elements, or for further operations. If different scenario elements are selected, a dialog will open and ask which layer to open in the table view.

Save your work and export all files to your working directory. The working directory is defined under ‘File > Working Directory…’ and is the default location for your data exports. You may also define a scenario name to get another file hierarchy inside your working directory to facilitate working with planning variants.

Show selected elements from the table view in the map view. Easily switch between map and ‘pinned elements’. in the table view.

Load background maps, e.g. from OpenStreetMap. Choose from various styles, including some map styles for dark themes.

Add an attribute to the scenario element.

Remove an attribute from the scenario element.
Move a layer up.
Move a layer down.

Toggle the visibility of a layer.
Network editing made easy.

Add a node by clicking anywhere on the map.

Move a node. Simply drag and drop a node from one location to another one. Also moves transit stops located on that node.

Add a link by clicking on the from-node and the to-node.

Add multiple nodes and links using the free-hand tool. Simply draw a line anywhere on the map and nodes and links will be added to your network.

Move multiple selected elements. This allows you to move multiple links, nodes in one go.

Merge your network by connecting two nodes. Simply drag and drop one node on another node. The nodes will be merged and the network connected.

Rotate the selected scenario element(s). This allows you to rotate single or multiple network elements.

Cut the selected elements off from the rest of the network. The network is cut by cloning nodes and separating links from each other.

Add inverse link(s). Open the network editor (table view), select the link(s) for which you want to create links in the opposite direction and find the icon at the bottom.

An interactive node editor to define turn restrictions across that node. Click on an ingoing link and then define disallowed next links by clicking on them.

Validate and clean your network. Will remove the smallest network cluster and make sure the network is connected for the specified modes.
Public transit editing features

Add a transit stop with a single click on a link. Places the transit stop at the link’s endpoint (to-node).

Add a transit route by clicking on each stop and link along the transit route. Click on ‘Finalize Transit Route’ once the route is complete.

Add a transit route by clicking on each stop along the transit route. The network route is automatically added. Click on ‘Finalize Transit Route’ once you have reached the final stop.

Add a transit route by clicking on the first and last stop. The network route and intermediate stops are automatically added.

Add a transit route by clicking anywhere on the map to create stops, nodes, links, all in one go. Click on ‘Finalize Transit Route’ once the route is complete. No need to create a network or add transit stops in a previous step.
Edit transit routes by dragging them on alternative link sequences. First click on a segment to select which transit route(s) should be edited, then drag-and-drop the transit route to alternative links. Double-click on route stops to detach them from the route and to drag the transit route to alternative transit stops. If the first or last route stop was detached the transit route will be trimmed accordingly. To expand a transit line simply drag-and-drop the first or last route stop to new transit stops.
Edit minimum transfer times. In the table view, select a transit stop and open the transfer time editor.

Open the selected transit line(s) or route(s) in a schematic network graphic view. There you can switch between a network, line or stop perspective to better understand your transit schedule.

Open the selected transit line(s) or route(s) in a graphical timetable view (time-distance graphs). There you can select from different network segments and zoom in/out and pan the view to better understand your transit schedule.

The integrated vehicle editor lets you easily configure transit vehicle types and vehicles. Create or delete buses, trains, etc., or modify their attributes. You can also filter vehicles by selecting specific transit lines or routes in the transit schedule editor, ensuring that only the relevant vehicles are displayed.
Cut/Trim selected transit lines or transit routes. Opens a dialog which allows you to choose at which stops or stop segments to interrupt the public transit service.
Validate and clean your transit data, e.g. remove unused stops or stops with invalid network link, orphaned transfer times, or unused transit vehicles.

Want to play with model trains? No problem! Seamlessly visualize train states and link states from your railsim output.
Population editor

Add a person or plan. Click anywhere on the map and start with the person’s first activity, then click again to add the next one to create activity-trip chains. For example: home-work-leisure-home. Click on ‘Finalize Person/Plan’ once the plan is completed.

Add an activity facility. Click anywhere on the map to create an activity facility. A person’s activity may moved onto a facility to register the activity at the facility.

Move a person’s activity to another location on the map or onto a facility. Simply drag-and-drop the activity.

Move a facility (together with all registered activities). Simply drag-and-drop the facility from one location to another one.
Use the integrated vehicle editor to manage private vehicles used by the population. Define different car types, motorbikes, vans, trucks, bicycles, etc.

Remove all unselected plans for the selected person. This operation can be found in the population editor (table view).

Remove network-specific information from a person’s plan. Removes the network route and the link information of activities. Open the population editor (table view) and select single or multiple persons.

Draw a population sample. Reduces your population and only keeps a predefined sample size. This operation can be found in the population editor (table view).

Clone the selected person(s). Optional: Blur activity locations or end-times, using different pre-defined distributions.

Modify your population, e.g., increase (clone) or decrease the population in a specific area or based on specific person attributes. Or, cut your population to a pre-defined area to work with a reduced population.

Edit individual plans. In the population editor (table view), open the plan editor to modify a person’s plan.

Add an activity to the plan.

Add a leg to the plan. A leg must be placed in between two activities.
Work with traffic counts.

Add a count station. Click on a link to place a count station on that link. You may add counts data and compare your simulated traffic volume with the counts data.

Move a count station. Drag-and-drop a count station to an alternative link.

Show the count data by time of day. In the counts editor (table view), you find aggregated count data statistics as well as count data for individual count stations.
Work with DRT (demand responsive transit), Taxi, Autonomous Shuttles, …

Create a single polygon or multiple polygons which serve as the service area for your DRT mode.

Easily adjust the DRT service area by dragging and dropping polygon vertices directly on the map. Alternatively, load an existing DRT area file to use as a starting point for your work.

Want your DRT mode to operate with virtual stops? Simply click on network links to add DRT stops directly. Alternatively, you can load DRT stops from a file.
Easily configure your DRT fleet using the integrated DRT vehicle editor. Create single or multiple vehicles, duplicate, remove vehicles, or adjust vehicle parameters, e.g. define seats and operation times.
Easily configure your simulation

Run a simulation locally using the MATSim GUI, with an in-built config editor. The executable MATSim JAR file can be embedded via the settings menu.

Run a simulation on a server. Currently a beta version for Microsoft Azure Batch Jobs is implemented. Interested in an alternative setup? Talk to us!

Embed and run your own custom executable JAR. You can start processes directly from within MobilityStudio.

Open your working directory. Easily find your data exports or simulation outputs.
Visualize and analyze your simulation data or any other spatio-temporal data.

Animate your data, e.g. vehicles, persons, activities, counts, XY-time data, and more. You can define the animation speed and choose from different clock stiles.

Pause the animation.

Jump forward in animation time by 1 hour, 1 minute or 10 seconds.

Jump backward in animation time by 1 hour, 1 minute or 10 seconds.

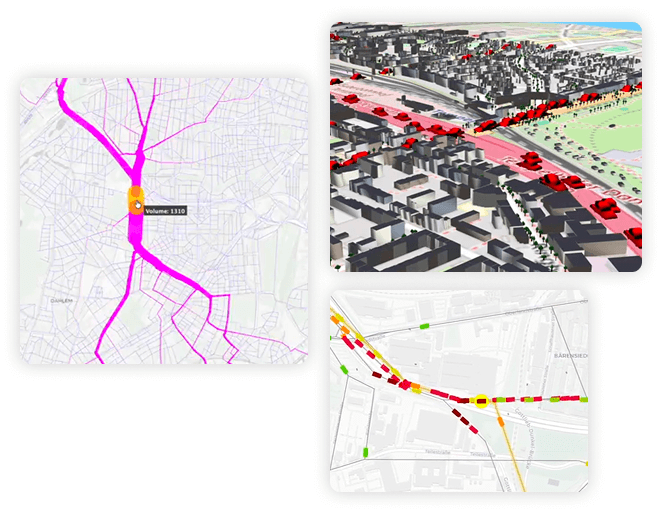
Analyze aggregate traffic volumes and public transit passengers per network segment.
Understand the usage of public transit. Analyze boarding and alighting passengers per stop, demand loads per stop-stop segment and transit line, demand transfer flows at stops, and more.

Create difference plots to compare network geometries or traffic volumes. Open the network difference map dialog. There you can load the first network data as layer A and then load a second network and simulation output as layer B.

Analyze traffic volumes and public transit passenger flows across network nodes (crossings).

Analyze your network to identify the top 10 bottlenecks where demand exceeds available capacity. Pinpoint the root causes of congestion and trace how spill-backs propagate through the system.

Load and analyze trips or legs from CSV data with ease. Seamlessly switch between trip- and leg-based views, or explore different aggregation levels such as zones or flows. Gain deeper insights into mobility behavior by analyzing movement patterns and flow dynamics.

Apply zones, groups and filters to your trips or legs analysis. You can also link your trip or leg data to the animation time.

Load your own polygon data as spatial analysis zones for the trips and legs analysis. Or load and visualize any spatial polygon data.

Record a video.

Take a screenshot.

Adjust the layer styles. Styles can be saved and exported to a file to be used across multiple projects. For most layers, you can choose from style templates using the dropdown at the bottom of the styler window. Alternatively, define your own style rules. And the best: Use the style rule builder to easily define entire rule sets; choose from different scales, color palettes etc.

Show the network paths of road or public transit users (“spider analysis”). Simply click on a link or transit stop to show the transport users’ paths using the clicked scenario element.

Measure cumulative distances. Click between points or use the free-hand mode.

Visualize isochrones for your road network or public transit schedule. Double click anywhere on the map and configure the isochrone computation, e.g. define the travel time, mode, time of day, etc. Also computes isochrone for congested networks.

Instantly compute routes by clicking directly on the map. Customize your analysis by selecting network modes routing weights (distance vs. time). Incorporates time-of-day traffic congestion and schedule-based public transit. Fine-tune your results by defining minimum transfer times and access/egress distances—making it the perfect tool for validating your transport models and network schedules.

Visualize any XY-Time data, e.g. noise or air pollutant emissions. Requires the spatio-temporal data in a csv data file with columns x, y, time, value.
MATSim 3D Visualizer

Open a network excerpt in the 3D viewer. Configure styles and explore your network and vehicles in an animated 3D view.

Load 3D buildings and trees from OpenStreetMap. These objects will be placed on your map.
Load background maps and 3D elevation tiles. You can choose from various map styles.

Switch to bird’s-eye view.

Rotate the 3D world and find the best perspective on your network or vehicles.
Move the 3D map without changing the camera view.

Move the camera position up or down.
Animate your 3D vehicles. You are in full control of time: Start, stop, jump forward/backward or start over.
The annotations layer: Improve your workflow!

Found an issue in your transport model? Place comments anywhere on the map. Comments are stored in the annotations layer and can be exported or imported from a file.

Move your annotations easily by dragging and dropping comments, drawings, or highlights to a new position.

Draw directly on the map. Your drawings are saved in the annotations layer, which can be exported or loaded from a file.

Highlight areas on the map using the highlighter tool. All highlights are stored in the annotations layer and can be exported or loaded from a file.
Are you ready to take the next step?
Unlock the full potential of your transport planning projects today. Experience the powerful interactive editor, advanced visualization tools, and a streamlined workflow. Start with a free trial to explore the features, or choose an annual license to integrate MobilityStudio into your daily work.